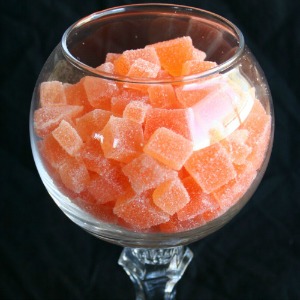
Goody Goody Gumdrops! Now you can make your own homemade gumdrops for Halloween or just for fun.
 I think my kids attend the last elementary school in America that allows a Halloween parade. It’s the best part of Halloween, if you ask me.
Except that I use the term “kids” loosely, since I only have one kid in elementary school, and it’s her very last year. *sniff sniff* Which means it’s the last year I’ll be worrying about Halloween costumes. It also means this year’s costume will probably be weird, because the 6th graders are never as cute and inventive as the 1st graders.
The little kids march around, dressed as the super hero of the year, or a pumpkin, or a bumblebee. Their moms and grandmas take proud pictures. The big kids throw on an old drapey thing left over from the year Scream came out. Or they dress as babies. {pet peeve: I can’t stand seeing a 12 year old kid with a pacifier, even at Halloween!} Or they put paint on their faces and come as… well, nothing, but with painted faces.
My daughter, the Hippie Chick, wants to be a gothic nerd this year.
I have tried Every. Year. For. Seven. Years. to talk her into being a witch. It’s adorable, she could wear cute stripey tights and carry a twiggy broomstick. But she remains unconvinced. It’s gothic nerd or nothing.
Ugh. I kind of hate Halloween. And not just because of the costumes. It’s mostly because I really hate spending money on candy.
Also? I hate making candy. And I know that sounds weird. But candy making is all precise and exact and created for detail-oriented people. Which is not me. Definitely not me.
And yet, here I am, making candy.
Funny story about that. This recipe has almost single-handedly changed my attitude about candy making. And about Halloween.
Some surprising pros & cons about making your own gumdrops:
- They’re super easy to make, and really not that precise at all.
- They’re easily customize-able to different flavors and colors and sizes and shapes.
- They’re gluten free. Which means we’ll be having these for almost every holiday celebration from now on!
- They look adorable in my new candy dish. And in little treat bags.
- They smell really bad while they’re cooking. If this wasn’t a family-oriented blog, I might be more descriptive. Let’s just say plain gelatin smells bad.
One thing our elementary school does not allow is homemade treats. Too bad. These would be SO cute at the classroom Halloween party! We’ll have to settle for cute friend gifts and lunchbox desserts.
Oh, PS, I made these little Halloween tags for the treat bags, and I’m sharing them with you. Feel free to grab the Halloween Treat Bags PDF and print your own. If you like the Halloween prints in the background, you can have those too. Free Halloween Printables are here.
Here’s some more detailed tutorial-type info for you:
- I poured my gelatin into an 11×7 pan lined with foil. I sprayed the foil with cooking spray first, and I was glad I did. An 8×8 pan would also work, but I definitely recommend lining it.
- After a few hours in the fridge, I turned it out onto a cutting board that was well coated in sugar. Trust me on this one. This stuff is sticky and it sticks to absolutely everything. Put sugar on the cutting board, and then another layer of sugar on top of your gelatin before you begin cutting. I also put a bunch more sugar around on the cutting board, because each slice will need to be coated, too, to keep the sticky mess down.
- Once I cut and sugared 3 or 4 slices, I then diced them into little squares. It really is pretty tough to get all the squares even, but you can get pretty close. If you don’t want squares, you could also use small cookie cutters to cut shapes.
- I put all my cubes into a dish filled with, you guessed it, sugar. You can certainly eat them right away, but the texture and flavor will improve a bit after sitting in the fridge a couple days in that dish of sugar. I recommend keeping these in the fridge, to keep the texture nice.
More Homemade Candies to love!
 Homemade Caramels Homemade Caramels |
 Pretzel Toffee Pretzel Toffee |
 Almond Balls Almond Balls |
This recipe adapted slightly from Rock Ur Party.
- 4 envelopes Knox unflavored gelatin
- ½ cup cold water
- half an orange
- ¾ cup water
- 2 cups sugar
- ¼ tsp. orange extract
- about 3 drops each red and yellow food coloring
- more sugar for coating, about 1-2 cups
- Combine gelatin with ½ cup cold water and the juice from half and orange. Set aside for 5-10 minutes.
- Combine ¾ cup water with sugar. Cut peel from orange half in large chunks, and add that to sugar mixture. Bring to a boil, then simmer for 5 minutes. Remove from heat, then remove and discard orange peel, and add food coloring and extract.
- Add gelatin mixture to syrup, and stir until completely dissolved.
- Pour into an 8x8 or 11x7 pan lined with greased foil. Chill for several hours.
- Turn out chilled block onto cutting board well coated in sugar. Spread more sugar over the top. Cut into cubes.
- Place cubes in a dish filled with sugar, and toss to coat. Chill several hours, up to 2-3 days. Use a colander to remove excess sugar from gumdrops before serving.
If you enjoy this recipe, you might also enjoy:
Turtle Candies from She Wears Many Hats
Homemade Gummy Candy from Skip to my Lou
Orange Sugar Cookies from Jen’s Favorite Cookies


I used to love these as a kid, have not had them since. Wow – i need to save this link!
I’ve been searching for a way to make this kind of treat from grape juice! I think I might try most of your method and see how it works! Thanks…
Pingback: Accountable to Friday #6 « Circle of Blog
Mmm, I love gummy candy and these look sooo good. I haven’t made any candy yet but I intend to but get put off too with all the exact measuring, etc. I’m glad these are easy and could be adjusted and used in so many different ways.
My eldest daughter left elementary in the Summer and now in high school, I feel your pain! And whaaat? Big kids dress as babies? Gah, it drives me insane too. I haven’t seen it here (other than the craze in th 90’s where kids had those plastic paci necklaces) but then Halloween isn’t celebrated half as much in the UK as it is over the pond.
Maybe you could talk your daughter into being a goth witch? Anyway, I never knew you could make your own gumdrops! The idea literally never occurred to me. How cool! And easy. Love this – thanks so much.
What a fun idea-these look easy to make and really tasty!
I hate making candies too becuase I’m so far from being detail oriented, so this looks like something I can do. Thanks for sharing!
This is right up my alley! Just an FYI, beef gelatin doesn’t smell as bad as the pork (knox) gelatin while cooking.
Thanks, Jenny! I love learning little-known food facts.
Hi Jen,
Thank you so much for sharing your awesome recipe with Full Plate Thursday. Hope you have a great weekend and come back soon!
Miz Helen
I can’t WAIT to make these! I am so glad I found you on pinterest 🙂 I’ll be back!
Pingback: Great Halloween Recipes | Jen's Favorite Cookies
I want to try these for Thanksgiving!
I think your pic was stolen though: http://pinterest.com/pin/186547609536707664/
I reported it to Pinterest.
Thanks for looking out for me, LaVonne! I actually submitted that picture to RecipeNewz, where it’s pinned from, and the RecipeNewz picture links back to me, so it’s all okay. Hope you like the recipe!
What a great idea! I want to try with the orange juice! Would it work with 100% orange juice?
sounds awesome!! and so easy!! I will try it as soon as possible!!
Pingback: Cream Cheese Mints | Jen's Favorite Cookies
Pingback: IRON CHEF: Runners’ Candy Challenge | thecheerfulkitchen
I actually have a few recommendations for you. First, if they candy is that sticky and needs to be kept in the fridge, add an extra packet of gelatin. I tend to use 6 packets of gelatin per batch, and not only do they not have to be refrigerated, I don’t have to sugar coat them. Secondly, you don’t have to limit yourself to extracts for flavors. Not having to worry about kids, many of the flavors I make are cocktails (as a note, a Mamie Taylor makes a fantastic gummy candy). The way I do it is this: Mix one cocktail, minus ice or extra water. Use that to bloom the gelatin while you make the syrup, No additional flavoring is needed for the syrup.
Also, I find it fun to use silicone ice cube molds to set the candy, so that I don’t have to cook it. You can get just about any shape these days. I let them set at room temperature for maybe an hour, and then pop them out and you’re ready to go.
4 enveiopes gelatin is how many grams?
I’m new to baking.
Rose, I used the Knox unflavored gelatin. I think each envelope is about .25 ounce, or 7 grams. You can see it here: http://amzn.to/13PLkbI
Pingback: Halloween Treats to Make With (or For) Your Kids - Five in Ohio
Pingback: Halloween Treats to Make With Your Kids - Five in Ohio
I gotta try these. Like right now. I cannot get over how pretty these are. Perfect photos Jen.
Jen,
Thanks for giving me the link to include in my upcoming Band Fruit Fundraiser Recipe Round Up! It will be published on 12/4/2013!
I made these and was kind of disappointed that these had much more of a Jell-o texture than gum drops. These actually taste and feel exactly like Jello-o jigglers. They are tasty but not like the candy I expected to end up with. This is not at all intended to criticize as the outcome is delicious, but just meant to note the difference in texture for those looking for a traditional gun drop.
Pingback: Happy Halloween: 20 Spooktacular Halloween Desserts - Hezzi-D's Books and Cooks
Just a note about lining the pan. You can use parchment paper and it won’t stick. I like to lightly grease just the bottom of pan first so the parchment stays put (it also helps to crease the parchment in the corners), but you don’t need to grease the inside of the parchment. It will peel away from the gelatin like nothing else!
How long will theses keep for,as I want to make for my wedding
I’m going to try to make rose gum drops using rose extract and a drop of pink food color. Thanks!