How make sugar cookies; The best sugar cookies recipes use this secret ingredient! Learn how make sugar cookies perfectly.
 These cookies are my all-time fav for basically every single holiday. Seriously, they’re like your favorite pair of black pumps, they go with everything.
Valentines Day? Heart shaped cutter and pink frosting.
St. Patricks Day? Shamrock cutter and green frosting.
4th of July? Star shaped cutter and white frosting with red and blue sprinkles.
Your dog’s birthday? Bone shaped cutter and make the frosting your dog’s favorite color.
Wait, dog’s don’t see in color. Or is that horses?
While these are popular at any holiday, at our house, they are an inarguable MUST at Christmas.
Over the years, I have taken my mother’s long-time favorite sugar cookie recipe, and perfected the details. These cookies are soft, never crumbly, and the cream cheese frosting is decadent, creamy, but never too oily. While the recipe itself is heavenly, it is the process that makes them absolutely perfect.

And so, it is the process I’ll be discussing today. Below are your rules for making the perfect soft sugar cookies, the ones your friends will remember for years and years. (Mine do.)
RULE #1: Follow the recipe exactly.
Those of you who do more cooking than baking may need to be reminded that when baking, you must measure. You must be precise. You don’t add flour until it looks about right, you add the exact amount of flour called for.
While normally I respect the choice of anyone to use butter or shortening more or less interchangeably, in this case, I strongly strongly recommend you use the shortening. My apologies to the Europeans who can’t find the stuff. Butter melts easier, which means your cookies will spread more, the consistency will change, and they may not turn out as well as hoped. If you absolutely must use butter, honestly, you might want to scour the interwebs for a recipe that calls for butter.
My very favorite thing about this recipe, the secret ingredient if you will, is the sour cream. It is the secret to success. Sour cream makes these cookies so soft and creamy, they are even amazing to eat frozen.
RULE #2: Chill the dough for 8 hours or more.
If you ever get impatient and think you’re going to chill for only 2-3 hours, you are going to regret it. This particular recipe needs, NEEDS, the full 8-10 hours of chill time. Personally, I chill the dough overnight before cutting.
Chilling the dough does two things. One is that it gives the ingredients time to combine, time to become one, time to taste even more amazing. The second is that it changes the texture of the dough. The dough needs to be cold when you roll it out, and cold when it goes in the oven. This will make the cutting clean and keep the cookies from spreading too far.
Plus, once you see the finished dough, you’ll know there is no way you can roll this dough without chilling it first.
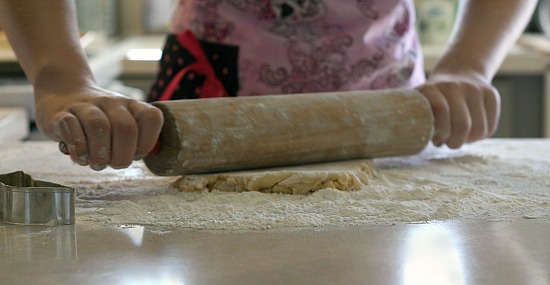
RULE #3: Roll the dough on a non-stick surface.
I’m hoping this one goes without saying, but I’ll say it anyway.
If you are really passionate about preserving the softness of your cookies, you can roll the dough between two layers of wax paper. However, I normally roll them on a floured countertop. A WELL floured countertop. It’s imperative the dough doesn’t stick to your rolling surface, because the cookies will not maintain their shape or thickness otherwise.


RULE #4: Roll the dough to the correct thickness.
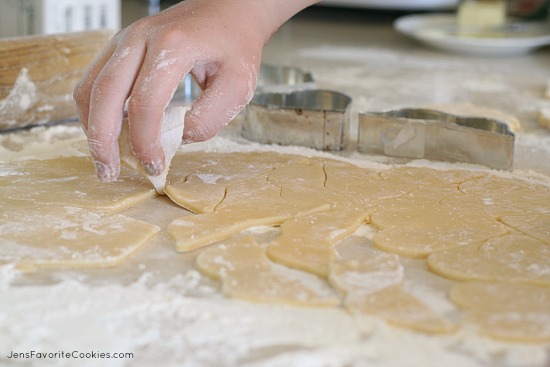
If this post only had one rule, it would be this one. This is the absolute, total, and complete secret to well-made sugar cookies. Do not, I repeat, DO NOT roll them too thin! I find it’s a tendency of most people to roll the dough thinner than it needs to be. The dough should be thicker than 1/4 inch. Mine is generally somewhere between 1/4 – 1/2 inch. Let’s call it 3/8 inch.
If the cookies are too thin, they will be crispy. The edges will be brown, and have a tendency to break off. They will lose all of the gorgeous softness that makes these cookies great.
Of course, if they are too thick, they can have different problems, like spreading too much and not being cooked through in the center.
If you are going to take care during just one step of the process, make it this step. Dough thickness is key.

RULE #5: Don’t overwork the dough.
Get as many cookies as you can out of each roll. You can gather and re-roll the leftover dough pieces, but be aware that the more you do this, the chewier the cookies will be. The added flour (from the floured countertop) and the added working activates the gluten and turns your cookies into bread. Which no one wants. Trust me on this.
Instead of more rolling, I like to use up the little scraps with little cookie cutters like these. I love these cute little 1-inch cutters! And instead of frosting a bunch of little cookies, you can make the frosting a little thin (by adding more milk or using less powdered sugar) and just dip the cookies in it. It’s fun, and kids love it.
Normally, I roll half the dough, and re-roll it once. Then I start with the second half, and re-roll it once. What is left from both halves is combined for a third and final roll. Any dough left after that is eaten raw. Because this might be the best raw cookie dough in the history of humanity.
RULE #6: Trust the timer.
This one is actually a little tough, because altitude and some other factors can affect baking time. I live in Utah, at an altitude of about 4500 feet. Technically, this is a high altitude environment. You may have to experiment just a little to get your baking time right. Mine bake for 10 minutes exactly. (Unless they’re tiny, then they bake for 8 minutes) Once you’re certain of the baking time, stick with it.
The reason I’m telling you this is that these bake slightly differently than an average cookie. When I make chocolate chip cookies, I make sure the edges and tops are just ever-so-slighly browned before I take them out of the oven. But sugar cookies are a different story. If they get brown, in my opinion, they’re overdone. There’s really no clear visual cue to when the cookies are done. Trust your timer, pull them out at the right time, and don’t let them get brown.

RULE #7: Make the frosting soft and creamy.
First of all, the cream cheese and butter both need to be soft when you make the frosting. Plan accordingly. Maybe when you put the dough in the fridge, it’s a good time to take the cream cheese and butter out, and set the on the countertop to soften.
As much as I love mixing things simply, in a glass bowl with a wooden spoon, to make this frosting smooth, I recommend using beaters. The small hand held electric beaters work great for this, much better than a spoon could ever do.
You can also adjust the texture of your frosting quite easily by adding more powdered sugar or more milk. I like the frosting a little on the soft side to match the softness in the cookies. I find that when I use a piping bag, I tend to use much more frosting than if I just spread it on with a knife, so if you’re planning to pipe the frosting, you may want to double the recipe.
RULE #8: Store in an airtight container.
Once the cookies cool, you can frost them right away. If you’re not going to frost them within an hour or so, though, put them in an airtight container, and make sure they are sealed up tight. Even large plastic zipper bags will do.
After frosting, if you want to use sprinkles, do it quickly. After you’re done frosting, let the cookies sit out for an hour or so, to let the frosting sit and harden a little. After that, there are a couple choices.
CHOICE #1: Place the cookies on a baking sheet or tray, in a single layer, (I can fit about 14-15 cookies on a baking sheet) and freeze them. Once frozen, put them in your airtight box with wax paper between layers. Then keep the box in the fridge or freezer. These cookies are fantastic frozen, but if you prefer them at room temperature, take them out of the freezer 60-90 minutes before serving.
CHOICE #2: (The faster choice) Skip the freezing, and just layer your cookies in your airtight box with wax paper between each layer. The down side here is that without freezing first, the wax paper will smush the frosting and all the work you did to make them pretty will go to waste.
If you’re going to eat your cookies within a day or two, you can leave them on the countertop with no problems. If they need to last longer, keep them in the fridge or freezer.

Is that enough rules? Honestly, it seems like a lot of rules, but these cookies are sooooo worth it. They’re just so soft and creamy and wonderful. I know a lot of people use royal icing or a simple glaze on their cookies (my mom uses a lemon juice and powdered sugar glaze) but there is just nothing that can compare to cream cheese frosting.
I hope you enjoy these cookies, and please feel free to leave questions or comments below. I will try to answer all questions!
Soft Sugar Cookies
Ingredients
Cookies:
- 1 cup shortening
- 2 cups sugar
- 3 eggs
- 1 cup sour cream
- 1 teaspoon vanilla
- 1 teaspoon baking soda
- 1 teaspoon baking powder
- 1 teaspoon salt
- 5 cups flour (+ more for rolling)
Frosting:
- 4 ounces cream cheese softened
- 2 tablespoons butter softened
- 2 tablespoons milk
- 2 cups powdered sugar
- 2-3 drops food coloring (optional)
Instructions
For Cookies:
- Cream shortening and sugar. Add eggs, sour cream, and vanilla and mix well.
- Add salt, soda, and baking powder, and mix well. Add flour, and mix just until combined.
- Wrap dough tightly in plastic, or place in a plastic zipper bag, and chill 8-10 hours or overnight.
- Roll dough to ⅜-inch thickness and cut out shapes. Place on baking sheet and bake at 350F for 10-12 minutes.
For Frosting:
- Combine all ingredients, mixing until smooth. Frost cooled cookies.
- Store in an airtight container between layers of wax paper. Will keep best if refrigerated or frozen.


I’ve been searching for a good sugar cookie recipe my whole life. I can’t wait to try this recipe, Jen. The shortening freaks me out a bit but hell, I’ll do and use anything for a good cookie!
Thanks for the detailed explanation of why each of the steps is important. So helpful!
Excellent tips and advice on baking thee cookies. And frosted soft sugar cookies are in my all-time top 5 of cookies. Yum!
Loved your tutorial Jen, very comprehensive. I am an avid user of cream cheese also. The shortening gives the cookie a crisper edge than butter or margarine. Also, by adding a little corn syrup to the frosting you get a shiny glaze instead of the matte finish without it.
Very detailed! But I’m going to ignore you then come blame you when the recipe fails 😀
I agree with Nancy, the shortening freaks me out, (I’m a purist, butter fan). Any suggestions on what kind of shortening to use? Any brand better than another? Nice tip from LaVerne as well. How much corn syrup?
Jen – LOVE the tutorial!!! I’ve always wondered about my cookies, and suddenly it all makes sense. Thank you and keep it up!
Aw, thanks Laryssa! I don’t think brand matters too awfully much. That being said, I’m partial to butter flavored Crisco. Good luck with your cookies!
Also, where’s my “Like” button for Carla?
Pingback: Blah and Books and Barbies and Baby Jesus.
Thanks so much for this recipe! Found it on Pinterest and we loved it. I made a different frosting, but I can vouch that the cookies themselves were really great!
How thick do you roll out your dough? I can’t tell if the recipe says 3/8, 5/8??? Thanks so much!!
Lisette, I don’t usually measure, I just do it by feel. That being said, I think it’s about 3/8″. 1/2-inch is too thick.
Hi Jen, and thank you chat wait to give these a try. I have a question for you can we add extra ingredients to the cookie dough? For example grated orange or lemon zest, vanilla and almond extract, if so how much?
Lupe, absolutely! I would use about a tablespoon of orange or lemon zest for a light citrus flavor, or about 1/2 teaspoon of almond or other extracts. You can use a teaspoon or even more of vanilla, but other extracts tend to be stronger, so be careful not to overdo it.
Can I freeze this dough?
Becca, absolutely! I’ve actually never done it myself, so this is my best guess, but I would recommend freezing in flattened discs, and letting it come to a bit cooler than room temperature before rolling.
Pingback: Chocolate Sugar Cookies | Jen's Favorite Cookies
Here is a great alternative to using flour to roll out your dough…..Use powdered sugar instead. IT works great and will not make your dough so heavy….This recipe looks so tasty…can’t wait to try it!
Dough was really sticky impossible to roll out? How can i correct? I measured amount exactly and followed directions.
Kent, I’m sorry you had this problem! If the dough is too sticky, it usually indicates one of a couple things… either the measuring wasn’t correct, and there is too much liquid or not enough flour; or the dough didn’t chill long enough. Even with 8 hours of chilling, I use plenty of flour on the countertop to roll it out. I hope this goes better for you next time.
Hi there! Thanks for such a detailed recipe! I’m excited to try this ASAP, although I’m not quite sure if I should bring the cookie dough ingredients to room temperature or not (eggs, shortening, sour cream).
Carly, there’s no need to bring them to room temperature first. I never do. 😉 Good luck with them!
Hey Jen! Ok, so I made the dough and when wrapping it, it felt really, really soft. And now, after 24 hours of refrigeration, it still feels really soft. It’s much softer than playdough, it does not hold it’s shape in my hand for very long at all. Is this the normal consistency? If not, could I freeze it for a couple hours before rolling to make it more stuff? This is, like, the 2nd time in my life making sugar cookies, so I’m clueless here… Forgive me! 🙂 Thanks in advance!
Carly, before chilling, the dough is a little soft and sticky. It’s one of the major reasons it requires a good 6-8 hours to chill before baking. Getting the consistency right is a little bit of an art form, and works better with a little practice. Too much flour makes a tough cookie that’s not so wonderful to eat, but a cookie that is too soft won’t hold it’s shape well. After chilling and rolling, the dough should hold it’s shape well enough to transfer from the countertop to the baking sheet. That being said, I never stray from this recipe, and it has always turned out great for me.
Ok, so I was generous with the flour when I rolled them out and the consistency was right. I made the first ones a bit too thick, but really, w/ how moist they are, the “messed-up” ones ttasted almost like a piece of yummy cake. We just frosted them and they are so super delicious! Thanks so much for the recipe, and help along the way. Happy holidays to you!
Carly, I’m so glad it worked out! I’m sure now that you have a little practice, the next batch will be even better!
Hi Jen! Quick question, I was giong to make these cookies tonight, or at least start the process, and I wanted to swirl them for Christmas. Do you thnk it is best to do the swirling before chilling overnight or do that after several hours of chilling and then chill again before slicing and baking? This is my first attempt at this and I don’t want it to mess up!
Thanks,
Jen
I would chill before rolling two different colors together. I think that will make for a much cleaner look. Good luck!
hi! although the frosting sounds fantastic, I’m wondering if these stand well on their own without it?
Alexis, sure, why not? I personally prefer them with lots of frosting! It might be fun to mix in some sprinkles to give them a little extra color, but they are certainly fine unfrosted.
Is this a high altitude recipe? Thanks
Gloria, I live at about 4500 feet, which yes, is technically high altitude. If you are at a lower altitude, you may need to adjust the baking time a little, but I wouldn’t think it would be too much different.
Hi- I’m new to cutout cookies and I’ve heard not to use baking soda/powder which causes them to spread. Is this not the case for this recipe?
Baking soda and baking powder are both leaveners, and without them the cookie will not rise at all, and the texture will be far different. If you’re worried about spreading, you can always cut the cookies, then pop them in the freezer for 4-5 minutes before baking.
Thank you so much. I can’t wait to try the recipe this weekend
🙂
I needed to make 85 teardrop shaped cookies with blue icing for a Lenten Tea for my daughter. This was perfect, as well as your instructions for freezing between layers of waxed paper. They received rave reviews, looked beautiful, and were delicious. This recipe s a keeper. Thank you for all your tips, especially the need to refrigerate for 8 hours and to use LOTS of flour when rolling.
Hi Jen,
I have been searching for a sugar cookie with cream cheese recipe my whole life and cannot wait to make these soon. However, since I am an amateur, I have to ask what the “T” stands for in the recipe directions: tablespoon, teaspoon, ect? Thanks for this!
It’s tablespoon. I’ll update the recipe card to make it clearer.
Ohhhhh…that makes sense :-/
Thank-you for clarifying- can’t wait to try these!
Hi Jen, made the cookies tonight and they are delicious!
I replaced the milk for the frosting with light cream and it came out great! Thank-you so much for this recipe.
My dough has been in the refrigerator for almost 24 hours and it is still fairly soft. Cold, but soft. Is it supposed to be like this? Is this a fairly soft cookie dough?
Lisette, it is kind of soft. Use plenty of flour when you roll it out, and I’m sure it will be fine.
Should the cookie sheet be greased/sprayed before baking
Ng cookies? I couldn’t see where that was addressed
It depends on what type of pan you use. I prefer to use an aluminum half sheet pan, and I line the pan with either a silicone liner or a piece of parchment paper. If you don’t have those, you could spray the pan with some non-stick cooking spray. If you are using a well-seasoned pan or a stone, you may not need any of these solutions.
Ditto aluminum cookie sheet and parchment always for all cookies.
Almost this exact recipe has been handed down in our family for four generations, originally from Wisconsin then Nebraska. Due to altitude, my recipe has a bit more baking powder and a bit less salt. I use a glaze and colored sugar to frost. After four generations, trust me when I say these are the best. And, yes, follow the suggestions Jen has made. They are critical to success.
Jen, I stumbled upon this recipe a couple of years ago, and it has been my all time favorite sugar cookie!! Thank you for this recipe, it is a gem!!!
Is this recipe good for high altitude?? Any tips for adjusting to high altitude if not?
I’m actually at about 4500 ft, which is pretty high. You may have to watch the baking time a little, but otherwise you should be fine.
I am a baker. Meaning I love to bake. Then I moved to Denver. I hate to bake. Now I found this recipe and these were AWESOME! My daughter and husband loved them. I appreciate how you had all of the details FIRST and then the recipe. That helped me a lot. Followed exactly as posted and they were perfect. My favorite cookie however are Chocolate Chip. Do you have a recipe for those? THANK YOU for an amazing Sugar Cookie.
I love to bake and when I moved to Denver baking became a problem. I found this recipe and followed it EXACTLY even using the butter flavored Crisco. These turned out amazing. My daughter said they are the best sugar cookie she has ever had. She would know. I am more of a chocolate chip cookie girl. I am making these again and adding the lemon zest to half of the dough. Thank you so much for bringing baking back to me. I did find a great chocolate chip cookie too.
I am in Breckenridge co
Altitude 9500
Any adjustments to be made